
Rule-Based and AI detection
Embark on a journey into Cyguru's state-of-the-art detection features, where the fusion of AI-based intelligence and rule-based methodologies converges to create a formidable shield for your digital landscape. Our next-generation Security Operation Center as a Service (SOCaaS) employs cutting-edge artificial intelligence algorithms to autonomously sift through vast datasets, discerning patterns and anomalies that may indicate potential threats.
The AI-based detection engine within Cyguru is designed to evolve and adapt, learning from historical data to enhance its threat identification capabilities continually. This adaptive intelligence ensures a proactive response to emerging threats, safeguarding your digital assets with unmatched efficiency.
Complementing the AI-driven prowess, Cyguru provides a rule-based detection framework, allowing you to define customized policies tailored to your organization's specific security requirements. Dive into the documentation to explore the nuances of crafting and fine-tuning rules, empowering you to take control of your security strategy.
This section of the documentation serves as your guide to harnessing the full potential of Cyguru's detection capabilities. Whether you're a security professional seeking to maximize the effectiveness of our AI algorithms or an IT administrator configuring bespoke rule sets, we've curated comprehensive insights and step-by-step instructions to ensure you navigate this powerful intersection of artificial and rule-based intelligence seamlessly.
Stay ahead of the cybersecurity curve with Cyguru – where innovation meets security, and intelligence meets defense.
Stay ahead of the cybersecurity curve with Cyguru – where innovation meets security, and intelligence meets defense.
Vulnerability and configuration detection
Delve into Cyguru's robust Vulnerability Detection and Configuration Assessment capabilities, integral components of our advanced cybersecurity suite. Our platform seamlessly integrates state-of-the-art mechanisms to identify vulnerabilities and assess configurations, providing a comprehensive view of your digital security posture.
Cyguru's Vulnerability Detection employs cutting-edge scanning techniques to meticulously examine your network, applications, and systems for potential weaknesses. The platform's sophisticated algorithms continuously update their knowledge base, ensuring they stay abreast of the latest threats and vulnerabilities. This proactive approach allows you to preemptively address potential risks, fortifying your infrastructure against evolving cyber threats.
Complementing this, the Configuration Assessment feature empowers you to evaluate and optimize the security configurations across your ecosystem. Gain insights into misconfigurations that could expose vulnerabilities, and leverage actionable recommendations to enhance your overall security posture. Cyguru's Configuration Assessment is your ally in maintaining compliance, aligning your organization with industry best practices.
In this section of the documentation, we provide a comprehensive guide to utilizing these powerful features within Cyguru. Whether you're a security analyst conducting in-depth Vulnerability assessments or an IT administrator streamlining configuration management, our documentation equips you with the knowledge to leverage these functionalities effectively.
Empower your organization with Cyguru's advanced Vulnerability Detection and Configuration Assessment – where proactive security meets actionable insights.
Compliance overview
Dive into Cyguru's comprehensive Compliance monitoring infrastructure, a robust feature that seamlessly aligns with and supports all the standards upheld by Wazuh. Our platform provides a vigilant eye over every facet of your organization's activities, ensuring adherence to industry-specific and regulatory Compliance standards.
Cyguru's Compliance Monitoring goes beyond mere surveillance, actively interpreting and contextualizing events within your infrastructure to demonstrate compliance with recognized benchmarks. Whether it's PCI DSS, HIPAA, GDPR, or other industry standards, our platform leverages a sophisticated monitoring system to track and report on activities that impact Compliance.
This feature serves as your steadfast ally in navigating the intricate landscape of regulatory requirements. Gain real-time insights into your organization's adherence to security protocols, effortlessly generate compliance reports, and stay ahead of potential issues. Cyguru's Compliance Monitoring is designed to streamline the often complex task of ensuring your digital landscape aligns seamlessly with industry standards.
In this section of the documentation, explore how Cyguru's Compliance Monitoring feature empowers your organization to not only meet but exceed regulatory expectations. Whether you're a compliance officer seeking detailed reports or an IT professional tasked with maintaining a secure and compliant infrastructure, our documentation provides step-by-step guidance to maximize the benefits of this integral Cyguru feature.
Elevate your organization's Compliance posture with Cyguru – where cutting-edge technology meets regulatory excellence
Cyguru encyclopedia
Uncover the depths of cybersecurity knowledge with Cyguru's unique Encyclopedia feature, a powerful resource that empowers users with comprehensive insights into cyber threats, tactics, techniques, malware, and attacking groups. Rooted in the renowned MITRE ATT&CK framework, this feature transforms complex cybersecurity concepts into an accessible and user-friendly knowledge repository.
Cyguru's Encyclopedia serves as your go-to reference, providing detailed information on a wide spectrum of cybersecurity topics. Whether you're a seasoned cybersecurity professional seeking in-depth analysis or a newcomer to the field looking to enhance your understanding, our platform offers a curated repository of knowledge to meet your needs.
Explore detailed entries on various attack vectors, understand the tactics employed by threat actors, and stay informed about the latest malware and attacking groups. The MITRE ATT&CK framework forms the backbone of this feature, ensuring that you gain a holistic understanding of the cybersecurity landscape and are well-equipped to make informed decisions to safeguard your digital assets.
Within this section of the documentation, discover how to leverage Cyguru's Encyclopedia to enhance your cybersecurity acumen. From navigating the user-friendly interface to utilizing the wealth of information available, our documentation provides a step-by-step guide to extracting maximum value from this invaluable feature.
Empower yourself with knowledge, elevate your cybersecurity defenses with Cyguru – where information meets insight in the ever-evolving landscape of digital security.
Platform Guide
Welcome to the Platform Guide, your go-to resource for unlocking the full potential of our AI-powered next-generation Security Operation Center (SOC). This comprehensive guide is designed to walk you through the key features and functionalities of our platform, ensuring you harness the power of cutting-edge security technology effortlessly. Whether you are a seasoned security professional or a newcomer to the field, this guide will empower you to navigate our platform with confidence and optimize your security operations. Let's dive into the future of cybersecurity together.
Installation of Cyguru
- Download and install the Wazuh infrastructure following the official Docker installation guide, or use an existing Wazuh setup. If you are using a dockerized Wazuh infrastrucutre and you are setting it up for the first time please visit the certificates configuration chapter first.
- Set up a virtual machine with the following specifications:
- Latest Ubuntu Server
- 4GB RAM
- 4 vCPUs
- 100GB HDD
- Obtain the Cyguru source code by either:
- Unzipping the provided source package, or
- Downloading it from Git (if access has been granted).
- Configure the environment variables:
- Edit the
.envfile included in the source code. - Refer to the next chapter for detailed configuration instructions.
- Edit the
- Extract and move the necessary files:
unzip folder-volume.zipmv centos_script_folder/ certificates_folder/ logs/ macos_script_folder/ ubuntu_script_folder/ windows_script_folder/ /mnt/block-volume/ - Start the services:
docker compose up -d - Once the services are running, stop them if necessary:
docker compose down - On the first run, the Cyguru ecosystem will generate a private and a public key.
The public key must be configured in the Wazuh infrastructure for agent verification.
The generated public key is located at:
/mnt/block-volume/certificates_folder/cyguru.pem - Transfer the public key to Wazuh and configure it in
ossec.conf. Once configured, restart the services:docker compose up -d - Refer to the next chapter for instructions on configuring the public key in Wazuh.
Certificates Configuration
To establish secure authentication between Cyguru and Wazuh, you must configure the ssl_agent_ca section in
Wazuh's ossec.conf file. This section should reference the cyguru.pem certificate generated
in the previous step.
Step 1: Modify Wazuh Configuration
Locate and update the ossec.conf file in Wazuh to include the following authentication block:
                  <auth>
                    <disabled>no</disabled>
                    <port>1515</port>
                    <use_source_ip>no</use_source_ip>
                    <purge>yes</purge>
                    <use_password>no</use_password>
                    <ciphers>HIGH:!ADH:!EXP:!MD5:!RC4:!3DES:!CAMELLIA:@STRENGTH</ciphers>
                    <ssl_agent_ca>/wazuh-config-mount/etc/cyguru.pem</ssl_agent_ca>
                    <ssl_verify_host>no</ssl_verify_host>
                    <ssl_manager_cert>etc/sslmanager.cert</ssl_manager_cert>
                    <ssl_manager_key>etc/sslmanager.key</ssl_manager_key>
                    <ssl_auto_negotiate>no</ssl_auto_negotiate>
                  </auth>
Step 2: Modify the Wazuh Docker Configuration
In a new Dockerized Wazuh setup, you must modify the wazuh_manager.conf file located at:
/wazuh-docker/single-node/config/wazuh_cluster/wazuh_manager.conf.
Ensure the authentication block matches the one provided above.
Step 3: Update the Docker Compose File
Edit the official Wazuh docker-compose.yml file and add the following line under the volumes
section of the wazuh.manager service:
- ./config/wazuh_cluster/cyguru.pem:/wazuh-config-mount/etc/cyguru.pem
Your updated wazuh.manager service should look like this:
                services:
                  wazuh.manager:
                    image: wazuh/wazuh-manager:4.9.2
                    hostname: wazuh.manager
                    restart: always
                    ulimits:
                      memlock:
                        soft: -1
                        hard: -1
                      nofile:
                        soft: 655360
                        hard: 655360
                    ports:
                      - "1514:1514"
                      - "1515:1515"
                      - "514:514/udp"
                      - "55000:55000"
                    environment:
                      - INDEXER_URL=https://wazuh.indexer:9200
                      - INDEXER_USERNAME=admin
                      - INDEXER_PASSWORD=SecretPassword
                      - FILEBEAT_SSL_VERIFICATION_MODE=full
                      - SSL_CERTIFICATE_AUTHORITIES=/etc/ssl/root-ca.pem
                      - SSL_CERTIFICATE=/etc/ssl/filebeat.pem
                      - SSL_KEY=/etc/ssl/filebeat.key
                      - API_USERNAME=wazuh-wui
                      - API_PASSWORD=MyS3cr37P450r.*-
                    volumes:
                      - wazuh_api_configuration:/var/ossec/api/configuration
                      - wazuh_etc:/var/ossec/etc
                      - wazuh_logs:/var/ossec/logs
                      - wazuh_queue:/var/ossec/queue
                      - wazuh_var_multigroups:/var/ossec/var/multigroups
                      - wazuh_integrations:/var/ossec/integrations
                      - wazuh_active_response:/var/ossec/active-response/bin
                      - wazuh_agentless:/var/ossec/agentless
                      - wazuh_wodles:/var/ossec/wodles
                      - filebeat_etc:/etc/filebeat
                      - filebeat_var:/var/lib/filebeat
                      - ./config/wazuh_indexer_ssl_certs/root-ca-manager.pem:/etc/ssl/root-ca.pem
                      - ./config/wazuh_indexer_ssl_certs/wazuh.manager.pem:/etc/ssl/filebeat.pem
                      - ./config/wazuh_indexer_ssl_certs/wazuh.manager-key.pem:/etc/ssl/filebeat.key
                      - ./config/wazuh_cluster/wazuh_manager.conf:/wazuh-config-mount/etc/ossec.conf
                      - ./config/wazuh_cluster/cyguru.pem:/wazuh-config-mount/etc/cyguru.pem
Step 4: Copy the Certificate
Ensure that the cyguru.pem file is copied to the correct location:
cp /path/to/cyguru.pem ./config/wazuh_cluster/cyguru.pem
Step 5: Start the Wazuh Services
Once the configuration is complete, start the Wazuh services using:
docker compose up -d
For an Existing Wazuh Infrastructure
If you are configuring an already existing Wazuh setup (not using Docker), you must manually modify the
ossec.conf file, copy the cyguru.pem certificate to the appropriate path, and restart
the Wazuh manager.
systemctl restart wazuh-manager
Configure Account Enviromental Parameters
Below is a list of environment variables required for Cyguru's configuration. Ensure that all necessary values are correctly set in your deployment.
Shared Environment Variables
Redis Configuration
                REDIS_HOST=
                REDIS_PASSWORD=
                REDIS_PORT=
                REDIS_USERNAME=
OpenSearch Configuration
                OPENSEARCH_HOST=
                OPENSEARCH_USERNAME=
                OPENSEARCH_PASSWORD=
Wazuh Manager Configuration
                WAZUH_HOST=
                WAZUH_HOST_EXTERNAL=
                WAZUH_USERNAME=
                WAZUH_PASSWORD=
                WAZUH_NAME_ID=
                WAZUH_JWT_EXPIRY=
                WAZUH_AGENT_VERSION=
                WAZUH_COMMON_WORKSTATION_GROUP=
                WAZUH_COMMON_SERVER_GROUP=
Cyguru Organization Configuration
                ORGANIZATION_EMAIL=
                ORGANIZATION_NAME=
                ORGANIZATION_CERTIFICATE_ID=
                ORGANIZATION_USER_PASSWORD=
                PAID_WORKSTATION_AGENTS=
                PAID_SERVER_AGENTS=
                CERTIFICATE_EXPIRATION_HOURS=
                CERTIFICATE_EXPIRATION_BEFORE_HOURS=
                ORGANIZATION_EMAILS_ALLOWED=
PostgreSQL Database Configuration
                DATABASE_USERNAME=
                DATABASE_PASSWORD=
                DATABASE_HOST=
                DATABASE_PORT=
                DATABASE_NAME=
                SCHEMA_NAME=
Scheduler Service Configuration
SCHEDULER_HOST_PORT=
JWT Configuration
                JWT_SECRET_KEY=
                JWT_ALGORITHM=
                JWT_EXPIRY_MINUTES=
Certificate Service Configuration
CERTIFICATE_SERVICE_HOST_PORT=
Caching Service Configuration
                CACHING_SERVICE_HOST_PORT=
                DEFAULT_BASIC_CACHING_VALUE=
Amazon Email Settings
                AWS_REGION=
                SENDER_EMAIL=
                AWS_ACCESS_KEY_ID=
                AWS_SECRET_KEY=
Scheduler Files
                TEMPLATE_DIR=
                EXCEL_TEMPLATE_DIR=
RabbitMQ Configuration
                RABBITMQ_DEFAULT_USER=
                RABBITMQ_DEFAULT_PASS=
                RABBITMQ_HOST=
                RABBITMQ_PORT=
                RABBITMQ_QUEUE=
                MAX_RETRIES=
                DELAY_BEFORE_START=
Scheduler Cron Jobs
                CHECK_CHECK_ALERT_BOT_SECONDS=
                CHECK_DELETE_NON_MATCHED_AGENTS_SECONDS=
                CHECK_CHECK_EXPIRED_BLACKLISTED_ALERTS_SECONDS=
                CHECK_DISCONNECTED_NEVER=
                CHECK_WAZUH_CERTIFICATES=
Ensure that all the above environment variables are properly set before deploying Cyguru.
Add Agent
The process of adding an agent involves the download and installation of a file, locally in your device.
- Click Agents in the Organization section of the side menu.
- Click the +Add button in the top right corner.
- Set the Machine Name for your convenience and identify the Operating System and CPU Version of your device. Then click +Add to complete the process.
- Your new agent will now appear under the Agents section.You can now download the installation zip file and open the Installation Guide to help you with the installation process.
Congratulations, your device is now protected by Cyguru’s SOC services!! 🎉
Remove Agent
- Click Agents in the Organization section of the side menu.
- Identify the Agent you want to remove from your SOC Infrastructure and click the red trash can “Delete” Icon.
- Click “Delete” in the pop up warning window if you’re sure you want to delete this agent.
- Uninstall the agent from the machine it currently monitors, as this action will cease its system monitoring capabilities. (Refer to the “Agent Removal” subsection under the "Integration & Troubleshooting" section of the documentation for a step by step guide on how to do that)
Blacklist Alert Id
In specific scenarios, you might come across alerts flagged by our AI Analyst as potential threats, yet you recognize them as known issues or false positives. To optimize your experience and customize the alert system to align with your unique requirements, Cyguru provides a feature allowing you to manually blacklist such alerts for a specified duration. This ensures you won't receive further email notifications related to these specific concerns.
It's essential to understand that while blacklisting prevents email notifications for the chosen alerts, these alerts will still be accessible in the application dashboards. This approach ensures you maintain a comprehensive view of all alerts within the Cyguru platform, empowering you to monitor and review them at your convenience.
Step-by-Step Guide to Blacklist an Alert:
- Start by logging into your Cyguru account with your username and password.
- Click Settings in the Organization section of the side menu.
- Go to the Alerts Tab
- Browse through your alerts and identify the one you wish to blacklist. This could be an alert you recognize as a false positive, a known issue, or simply an alert you no longer wish to receive.
- After you click +Add, a pop window will ask you to enter the number of days you want to blacklist the alert and receive no emails regarding this issue. Keep in mind that the alert will continue to appear in the App and all relevant Dashboards. If you are sure, confirm the action. Once confirmed, the alert will be added to your blacklist.
Managing Your Blacklist:
- You can view and manage your blacklisted alerts at any time.
- Go to the Blacklisted Alerts section in your account to see all alerts you have blacklisted.
- From here, you can also choose to remove alerts from the blacklist if you decide to start receiving them again in the future.
Why Blacklist an Alert?
- Reduce Clutter: Blacklisting helps in reducing the number of irrelevant or redundant alerts, keeping your inbox cleaner.
- Focus on Relevant Threats: By removing known issues or false positives, you can focus more on alerts that are truly significant for your organization’s security.
- Customize Your Experience: Each organization has unique needs and threats. Blacklisting allows you to customize the alert system to better fit your specific circumstances.
Blacklisting alerts in the Cyguru application provides you with greater control over your cybersecurity notifications, ensuring that you receive only the most relevant and critical information. This feature is part of our commitment to offering a customizable and user-friendly cybersecurity experience.
Please note that blacklisting alerts is a feature provided for your convenience and is executed under your own responsibility. It's important to carefully consider the implications of blacklisting certain alerts, as this may impact the visibility of potential security threats. Cyguru is not responsible for any security incidents that occur due to alerts that have been blacklisted by the user. We recommend reviewing your blacklist regularly to ensure it aligns with your current security needs and threat landscape.
If you need help with blacklisting alerts or have any questions about this process, our support team is ready to assist you. Please don't hesitate to reach out to our support team at Cyguru.
Configuring Email Notification Recipients
In the latest version of Cyguru, the originally registered email address will no longer receive alert notifications by default. It is now mandatory for users to configure additional email recipients to ensure alerts are received. If no email addresses are configured, no alert notifications will be sent.
Step-by-Step Guide to Configure Email Recipients:
- Log into your Cyguru account using your username and password.
- Click Settings in the Organization section of the side menu.
- Navigate to the Notifications tab.
- Enter up to two email addresses in the provided input field, separating them with a comma. These recipients will receive AI Analyst ticketing notifications and alerts from all Cyguru components.
- Click +Add to save your settings. Alerts will now be directed exclusively to these configured email addresses.
Managing Your Email Notification List:
- You can view and manage your email notification list at any time.
- Go to the Notifications section in your account to see the configured email addresses.
- You can remove an email address and replace it with another one as needed.
Important: If no email addresses are configured, you will not receive any alert notifications. Ensure you complete this setup to stay informed.
Dashboards
Dive into the heart of cybersecurity visibility with Cyguru's Security Dashboards – a command center that delivers comprehensive insights and a holistic overview of your digital defenses. Our platform empowers you with intuitive dashboards meticulously crafted to provide real-time analytics, threat intelligence, and actionable insights. From threat detection to compliance status, each dashboard is designed to offer a consolidated view, ensuring that you stay ahead of potential risks and make informed decisions. Explore this section of the documentation to unlock the full potential of Cyguru's Security Dashboards, as we guide you through navigating, customizing, and leveraging these powerful tools to fortify your organization's security posture.
Agents
Welcome to the Agents Dashboard, your central hub for real-time insights into the operational heartbeat of your cybersecurity infrastructure. This dashboard offers a comprehensive view of your agents' status and infrastructure overview, enriched with key details about each agent's operating system and current status. It's the nerve center where you can monitor the health and performance of your security agents.
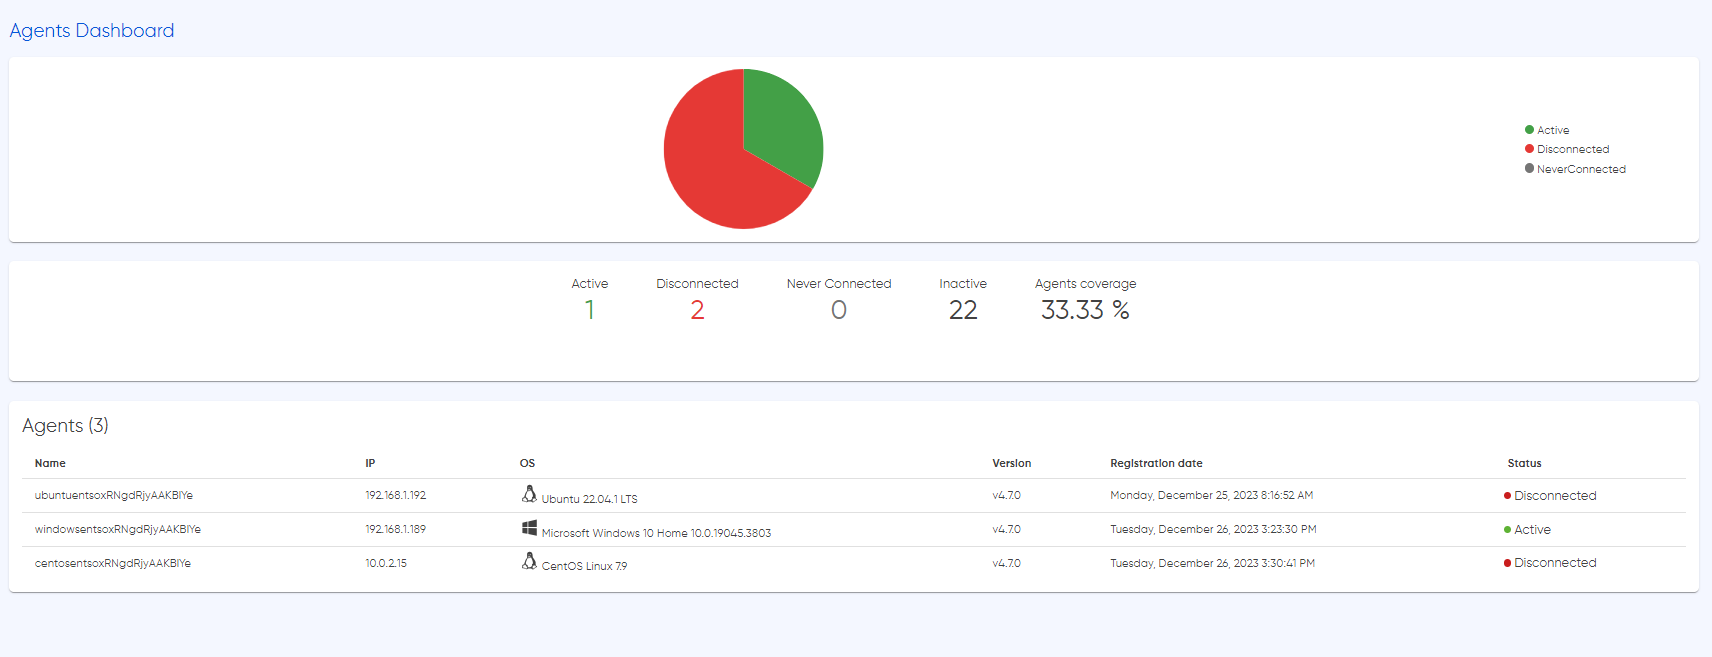
The agents dashboard provides details on the status of each agent, indicating whether they are active, disconnected, or never connected, signifying a successful installation. Additionally, an inactive status denotes that the agents are available for monitoring, but the installation process has not been completed or initiated.
It's important to note that the data presented on the Agents Dashboard is not only real-time but dynamically updated based on the caching mechanism provided by our Support and Criticality Bundles. This ensures that you receive near real-time updates, enhancing the accuracy and responsiveness of the information at your fingertips. Dive into this section of the documentation to explore the functionality of the Agents Dashboard, learn how to interpret critical details, and leverage the power of our caching mechanism for a comprehensive and efficient monitoring experience.
Security Events
Cyguru's Security Events Dashboard is your real-time window into the cybersecurity battlefield, providing a detailed and actionable overview of security alerts within your monitoring infrastructure. Dive into the specifics of each incident, as the dashboard seamlessly integrates with the MITRE framework, allowing you to correlate events with established tactics and techniques.
Explore the 'Extra AI Data' feature by simply clicking the blue button next to each alert, unlocking additional layers of intelligence about the occurrence. This extra context empowers your security team with rich insights, facilitating swift and informed response strategies.
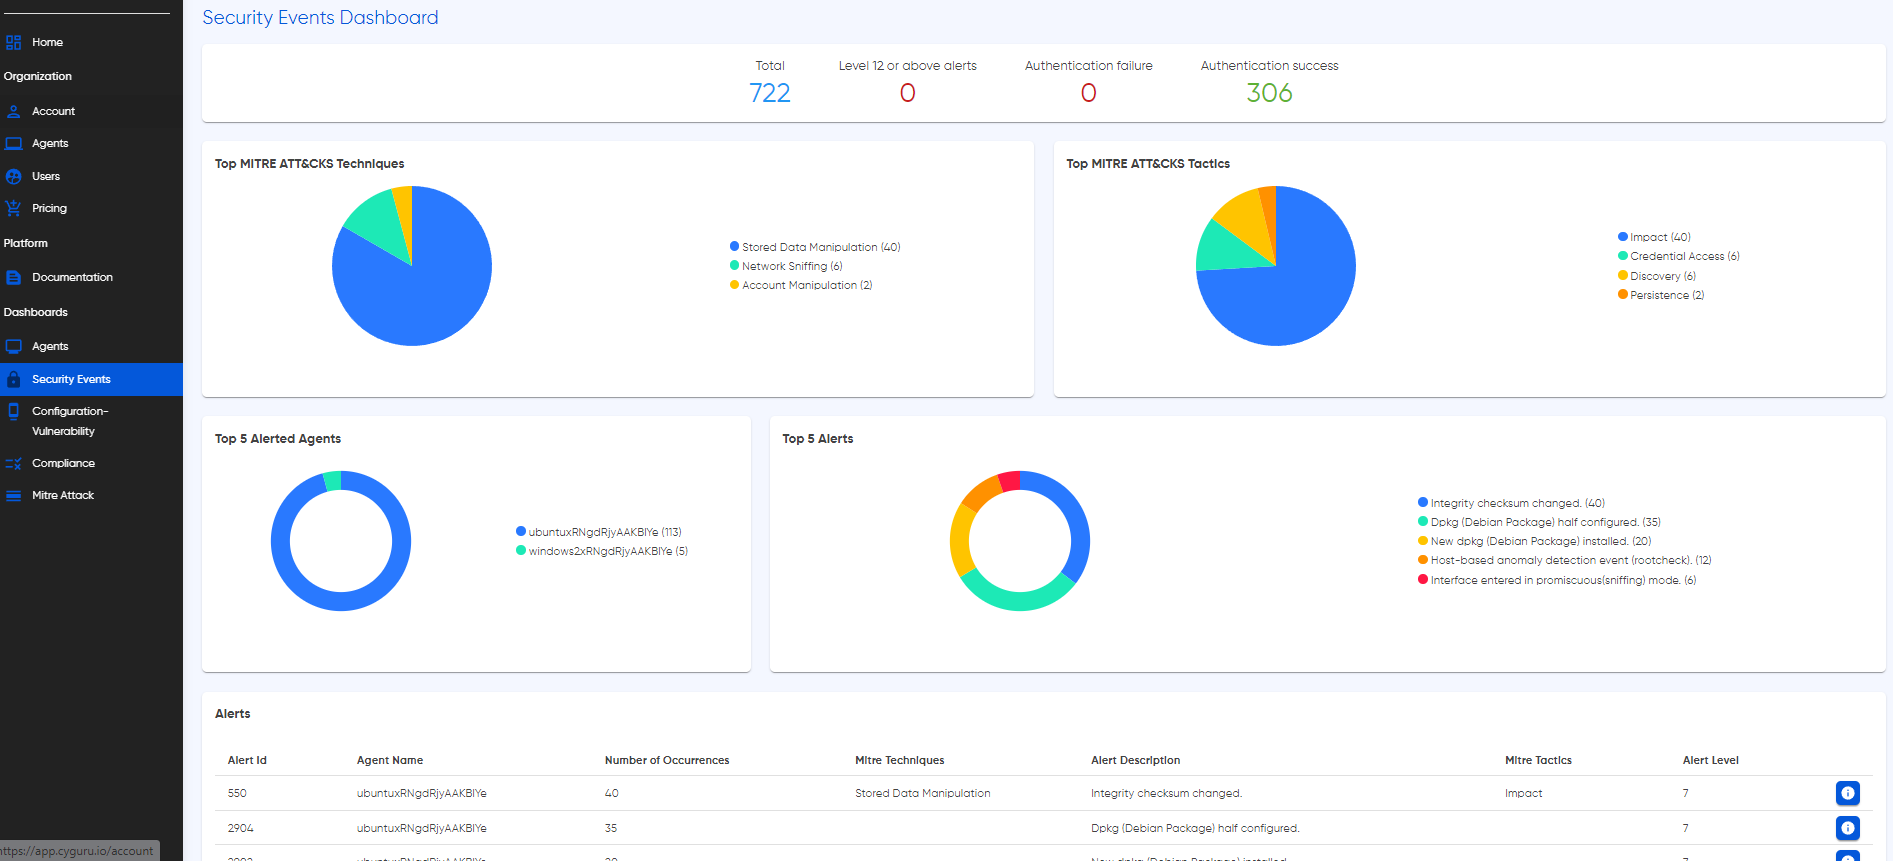
In addition to individual event details, the Security Events Dashboard presents dynamic insight pies and charts, showcasing the top 5 alerts, MITRE tactics, techniques, and the leading contributing agents. These visual representations are designed to simplify complex information, offering at-a-glance understanding of trends, potential threats, and agent performance.
Navigate this section of the documentation to learn how to navigate, customize, and derive maximum value from Cyguru's Security Events Dashboard. Empower your security operations with real-time intelligence, ensuring a proactive stance against evolving cyber threats.
Enhancing the efficiency of your threat monitoring, Cyguru's Security Events Dashboard is intelligently designed with a caching mechanism that aligns with the bundle subscribed by each user. This means that while the dashboard provides real-time insights into security alerts, the data is dynamically updated based on the caching mechanism associated with your specific bundle. The caching system, intricately tied to your chosen bundle (including Support and Criticality Bundles), optimizes the performance of the Security Events Dashboard. It strikes a balance between delivering near real-time data and minimizing the impact on system resources, ensuring an agile and responsive monitoring experience.
Configuration - Vulnerability
Cyguru's Configuration and Vulnerability Dashboard is your dedicated hub for proactive security assessments, offering a detailed examination of vulnerabilities and misconfigurations across your network. This powerful tool conducts vulnerability and configuration scans, providing a granular breakdown of important findings on a per-agent basis.
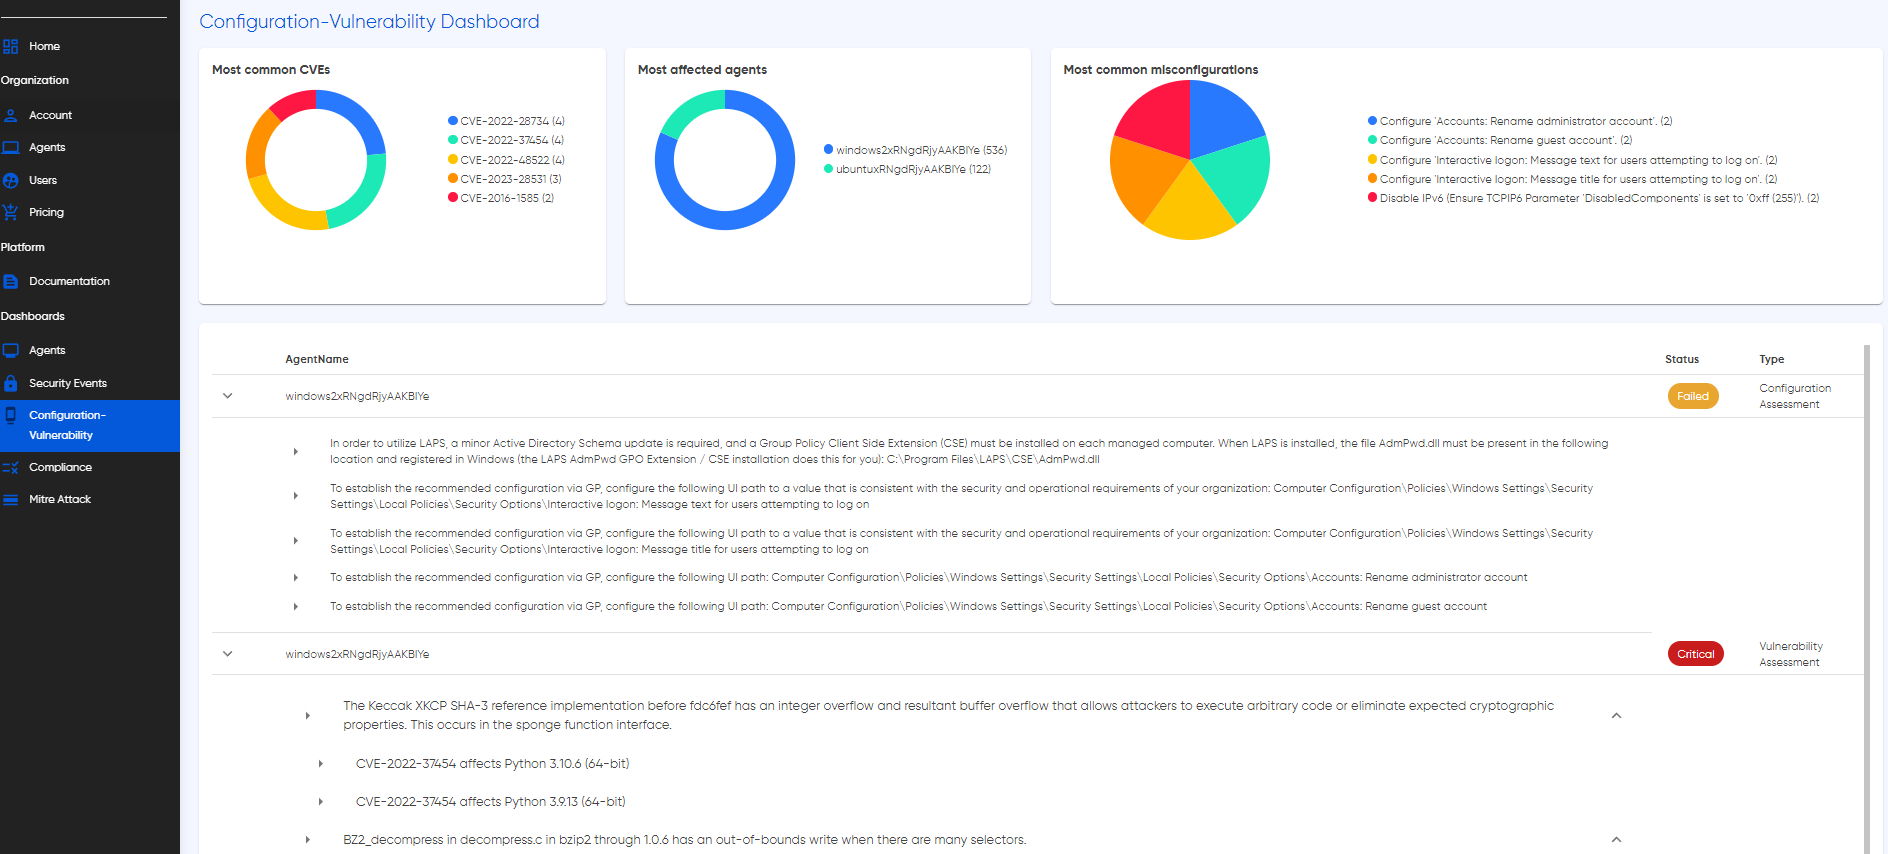
Navigate the intricacies of your system's security posture with real-time insights into detected misconfigurations and vulnerabilities. The System Scan Dashboard employs a sophisticated caching mechanism, ensuring that you receive timely updates without compromising system efficiency. This feature dynamically aligns with your subscribed bundle, providing a balance between the need for current information and resource optimization.
Compliance
Discover the power of Cyguru's Compliance Dashboard, a dedicated command center crafted to ensure your organization seamlessly aligns with a spectrum of Wazuh compliance standards. This robust dashboard synchronizes effortlessly with Wazuh's supported compliance standards, including but not limited to PCI DSS, HIPAA, GDPR, and more. By aggregating data from the monitoring system's security events, configurations, and vulnerabilities, this dashboard provides real-time insights into your organization's compliance status.
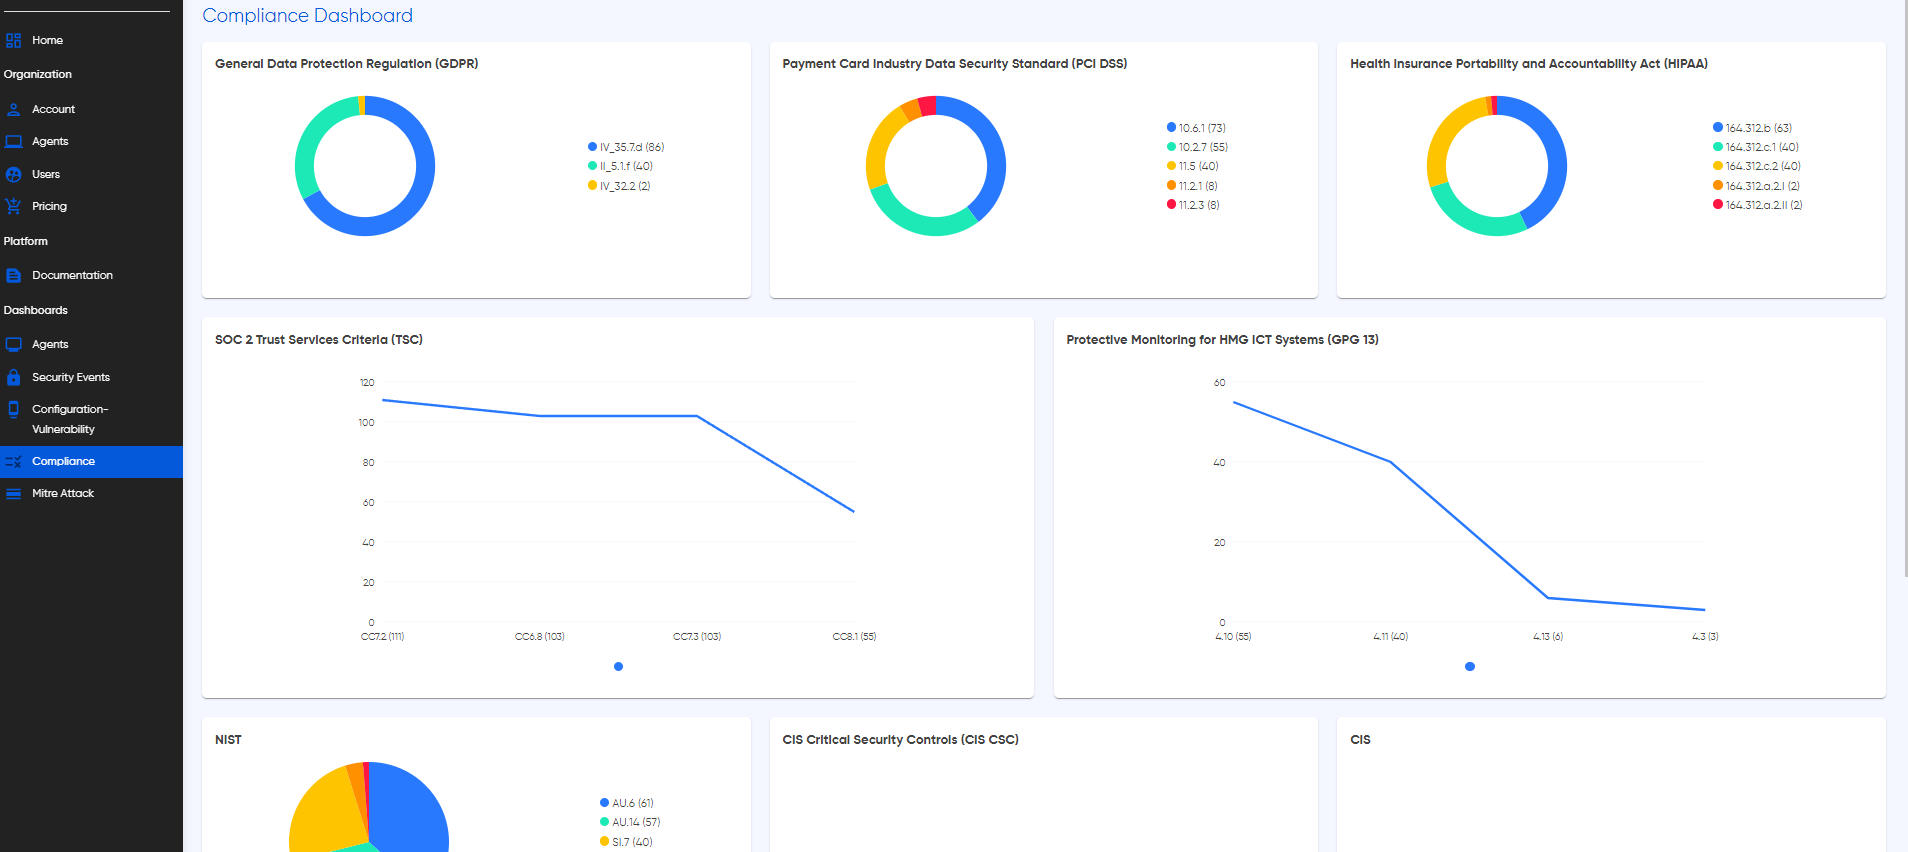
Real-time updates on compliance adherence are presented dynamically, ensuring your organization stays aligned with industry and regulatory standards. The Compliance Dashboard is fortified with a sophisticated caching mechanism, mirroring the efficiency of our other dashboards. This caching feature, tailored to your subscribed bundle, strikes a balance between staying current on compliance status and minimizing resource utilization.
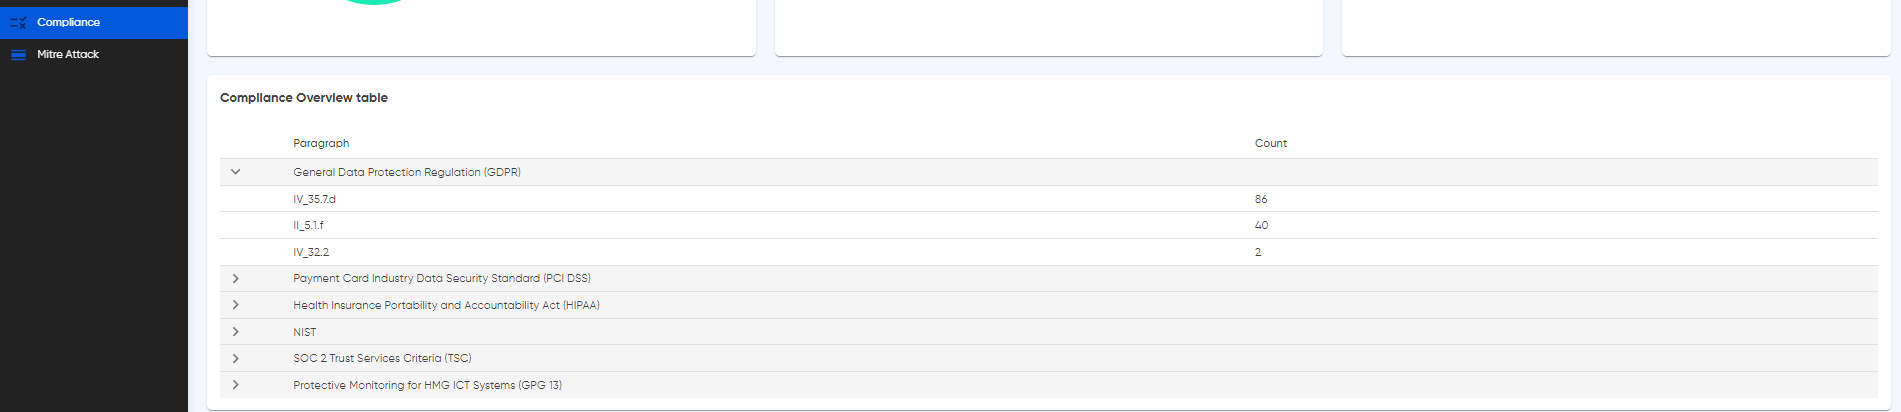
Efficiency meets clarity with Cyguru's Compliance Summary Table, a consolidated view that distills the wealth of information from various compliance dashboards into a single, easily navigable table. Here, we present a summarized overview of your organization's compliance status across supported standards, including PCI DSS, HIPAA, GDPR, and more. This table acts as a central hub, providing a snapshot of adherence levels based on real-time data from security events, configurations, and vulnerabilities. Seamlessly integrated with our caching mechanism, this feature ensures that you receive up-to-date compliance insights without compromising on system efficiency. Dive into this section of the documentation to explore how the Compliance Summary Table simplifies the complex landscape of cybersecurity standards, empowering your organization to maintain and showcase robust compliance postures effortlessly.
MITRE ATT&CK
Enter the realm of cyber knowledge with Cyguru's Cybersecurity Encyclopedia Dashboard – an unparalleled resource that transcends the boundaries of traditional monitoring. Immerse yourself in a treasure trove of information about threat groups, tactics, techniques, attacks, and malware, all seamlessly integrated with the renowned MITRE ATT&CK framework.
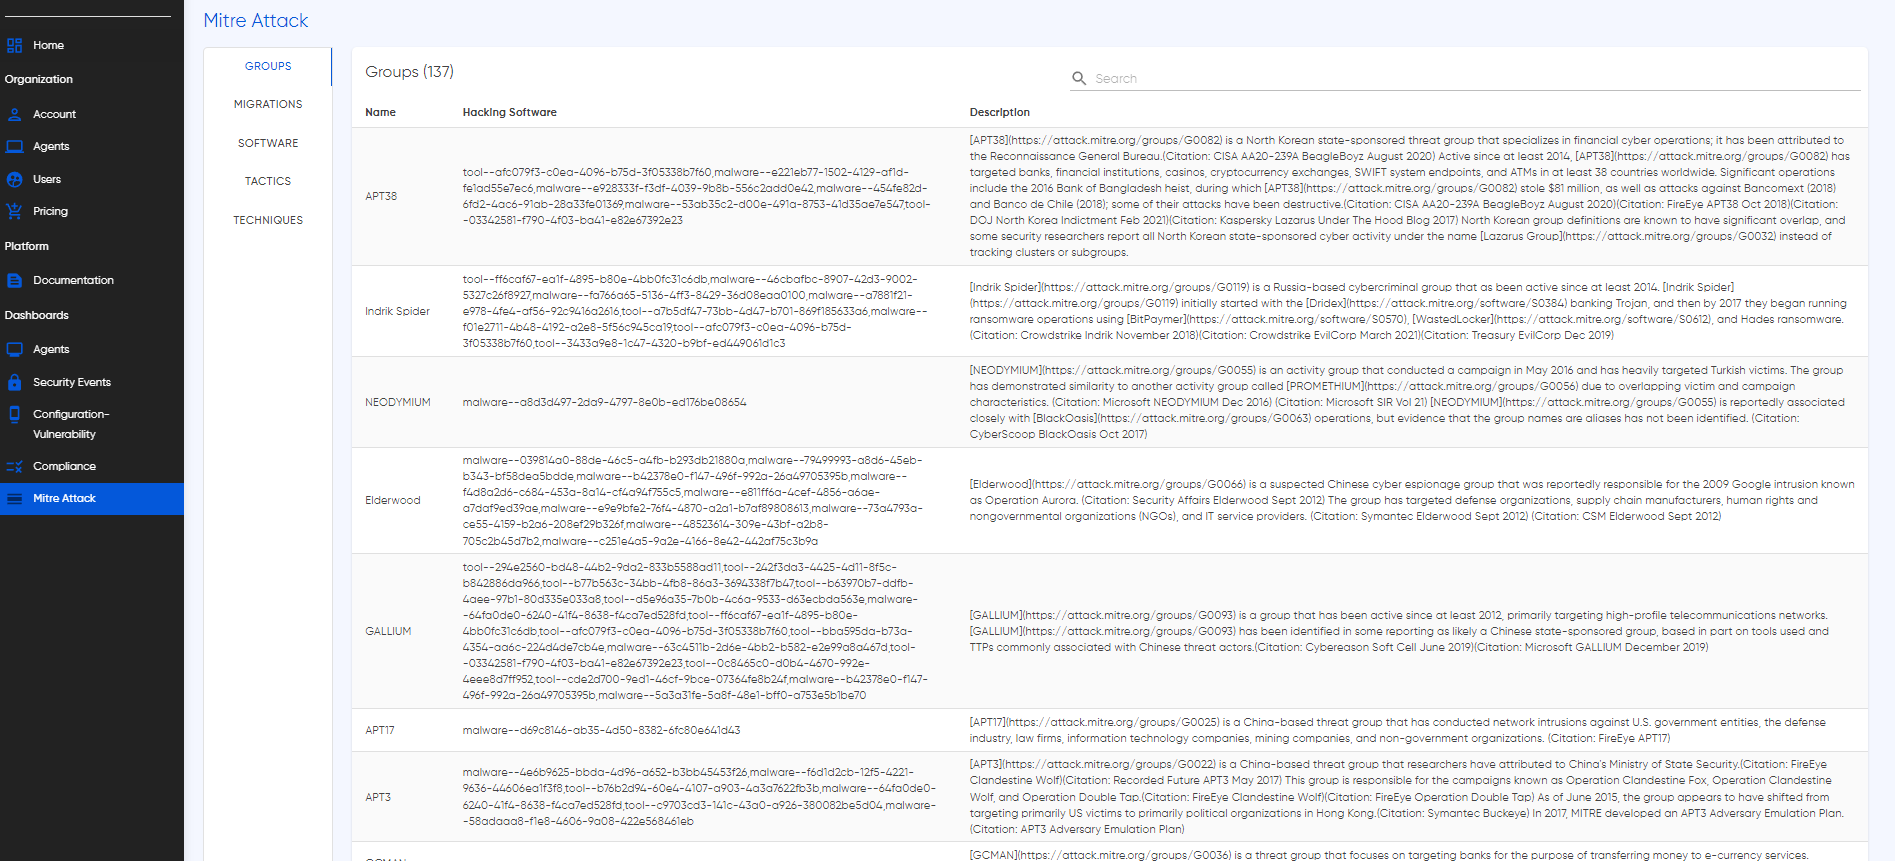
This interactive dashboard serves as an extensive repository, allowing users to search directly for related alerts and pertinent information. Whether you're a seasoned cybersecurity professional seeking in-depth analysis or a novice navigating the intricacies of threat landscapes, our Encyclopedia Dashboard offers a user-friendly interface designed to cater to all levels of expertise. Navigating this section of the documentation opens the door to understanding how to harness the power of the Cybersecurity Encyclopedia Dashboard. Learn to leverage its search functionalities, interpret MITRE ATT&CK framework insights, and gain a holistic understanding of cyber threats. Empower your organization with a rich repository of knowledge, where every search unveils new layers of intelligence, enabling you to stay one step ahead in the ever-evolving landscape of cybersecurity.
AI-Analyst
Cyguru's AI Analyst stands as the technological cornerstone of our cybersecurity infrastructure, ushering in a new era of proactive defense. This innovative component harnesses the power of advanced machine learning algorithms, operating as an autonomous and intelligent guardian for your digital landscape. At its core, the AI Analyst is engineered to automate threat detection with surgical precision. It dynamically analyzes vast datasets, swiftly identifying anomalies and potential security threats. This proactive stance ensures that emerging risks are not just detected but preemptively addressed. The AI Analyst is not just a tool; it's a force multiplier for your cybersecurity operations. Beyond detection, it streamlines communication, sending timely and detailed alerts that provide actionable insights. This strategic fusion of machine learning and communication optimization sets the stage for a robust and intelligent defense mechanism. In this documentation, we unravel the intricacies of the AI Analyst, delving into its operational nuances and showcasing the transformative impact it brings to your cybersecurity posture. Explore the future of cybersecurity with Cyguru's AI Analyst – your vigilant digital guardian, ever-ready to navigate the evolving landscape of threats with intelligence and precision.
Overview
Welcome to Cyguru, where innovation meets cybersecurity excellence! At the forefront of our mission is the seamless integration of advanced machine learning algorithms, setting the stage for a revolutionary approach to cybersecurity monitoring. Central to our offerings is our pioneering AI Analyst, a powerhouse designed to elevate your defense mechanisms.
This documentation unfolds a comprehensive overview of how our AI Analyst operates and the myriad benefits it brings to fortify your cybersecurity infrastructure. Our AI-Based AI Analyst is not merely a solution; it's a cutting-edge paradigm shift. Imagine automated threat detection, streamlined communication, and unparalleled efficiency seamlessly woven into the fabric of your security operations.
With machine learning algorithms at its core, our AI Analyst dynamically monitors your system's security, analyzing data, identifying threats, and dispatching timely alerts. Embrace the future of cybersecurity monitoring with Cyguru's AI Analyst – where innovation becomes your first line of defense, safeguarding your digital landscape with precision and intelligence.
Embrace a new era of cybersecurity alerting with Cyguru – where every notification is a symphony of intelligence, orchestrated by our cutting-edge AI Analyst.
Key Features
Embark on a journey of cybersecurity excellence with Cyguru's AI Analyst, a pioneering component poised to reshape the realm of threat intelligence. Nestled at the core of our cybersecurity arsenal, the AI Analyst harnesses the cutting-edge prowess of advanced machine learning, seamlessly translating data into actionable insights. Operating autonomously, it proactively identifies threats with surgical precision, safeguarding your digital terrain from ever-evolving risks. Going beyond mere detection, our AI Analyst orchestrates streamlined communication, delivering comprehensive alerts that empower your security teams with real-time intelligence. Immerse yourself in the forefront of cybersecurity defense with Cyguru's AI Analyst, where innovation converges with intelligence to fortify your digital resilience.
- Revolutionary Threat Detection: Experience unparalleled security with Cyguru's groundbreaking Automated Threat Detection. Our advanced SOC tools, powered by cutting-edge machine learning, tirelessly monitor your system for potential threats, ensuring a proactive defense strategy with unparalleled accuracy.
- Instant Awareness through Intelligent Email Alerts: Cyguru's sophisticated approach goes beyond conventional alerting. Upon threat detection, our automated system instantaneously crafts and dispatches comprehensive email alerts to your designated team. Stay in the loop in real-time, enabling swift response and mitigating potential risks effectively.
- Tailored Precision with Customizable Alerts: At the heart of Cyguru's alerting system lies flexibility. Customize alert criteria effortlessly, aligning the AI Analyst's parameters with your unique security needs and risk tolerance levels. This ensures that the alerts you receive are not just timely but precisely tailored to address the specific nuances of your digital landscape.
How It Works
- Continuous Vigilance: Our AI Analyst conducts unceasing system scans, utilizing the robust tools within Cyguru's Security Operations Center (SOC) to meticulously collect and analyze security data. This unwavering monitoring ensures a proactive stance against potential threats.
- Intelligent Machine Learning Analysis: Empowered by sophisticated algorithms, our AI Analyst performs data analysis with precision, distinguishing normal activities from potential threats. The infusion of advanced machine learning elevates the accuracy and efficiency of threat evaluation.
- Precision Alert Crafting: In the event of threat detection, our AI Analyst seamlessly crafts detailed email alerts. These meticulously outlined messages convey the nature and severity of the threat, accompanied by suggested remediation actions. This precision ensures that your team is equipped with actionable intelligence.
- Immediate and Targeted Notifications: Upon alert generation, the AI Analyst swiftly dispatches tailored emails to your specified contacts, guaranteeing that your team receives timely and targeted notifications regarding any security concerns. This immediacy empowers your team to respond promptly and effectively to mitigate potential risks.
Alert-Notifications
Overview
The Alert Notification section within the Cyguru web application stands as a dedicated space for clients, offering a consolidated and easily accessible view of all alerts. Here, our AI analyst initiates the alerting process by promptly creating and dispatching initial email notifications. However, acknowledging the dynamic nature of your infrastructure, it's imperative to recognize that changes may transpire after the initial email is delivered.
To address this, the Alert Notification section plays a pivotal role, providing real-time updates that reflect the latest developments in your dynamic environment. This strategic implementation ensures a continuous and informed alerting process without inundating your email addresses with redundant notifications. Furthermore, the centralization of this information within the Alert Notification section enhances both the security posture and the overall quality of the services we provide. This thoughtful approach not only minimizes the risk of overlooking critical updates but also offers a streamlined and efficient mechanism for clients to stay abreast of their cybersecurity landscape.
In contrast to the Security Events Dashboard, which offers a comprehensive view of generated alerts along with their analysis, the Alert Notification section goes a step further by presenting the AI analyst's detailed analysis as individual tickets for alerts deemed significant. While the Security Events Dashboard provides a broader and more generic overview of overall security, the Alert Notification section specializes in offering a more focused perspective on threat detection and mitigation actions. This nuanced approach ensures that clients can seamlessly navigate between a high-level understanding of total security events and a more specific, in-depth exploration of critical threat scenarios and corresponding mitigation strategies.
Key Features
Enhanced Centralization: The Alert Notification section in Cyguru's web application revolutionizes the management of cybersecurity alerts. By providing a centralized repository, clients can effortlessly access and review all pertinent alerts in one dedicated space. This enhanced centralization ensures a streamlined and efficient approach to staying informed about critical security events without overwhelming email inboxes.
Real-time Threat Visibility: Unveiling a real-time view of threat landscapes, the Alert Notification section offers granular insights into the analysis performed by our AI analyst. Each alert, considered noteworthy, is documented as a ticket, affording clients a detailed understanding of specific threat detections and corresponding mitigation actions. This targeted visibility goes beyond generic overviews, empowering clients to navigate the cybersecurity landscape with precision and make informed decisions to bolster their security posture.
How It Works
Mechanics of Operation: The functionality of the system is intricately tied to each user's predefined plan, encompassing criticality and support tiers. These plan specifications play a pivotal role in determining caching mechanisms and the nature of information presented within the Alert Notifications section. Notably, the plan directly influences the AI analyst's ticketing process, with the Ticketing SLA adhering to plan limits—Basic: every 4 hours, Gold: every 1 hour, and Platinum: every 30 minutes.
Plan-Driven Display: The user's plan also governs the information showcased in the Alert Notifications section. Tailored to user preferences, the display is influenced by plan distinctions. For Basic plans, up to three tickets per alert per agent are accessible. Gold plans extend this capacity to up to five tickets per alert per agent, while Platinum plans elevate it to a maximum of ten tickets per alert per agent. This customization ensures that users experience a personalized and plan-specific presentation of critical security information.
What You See
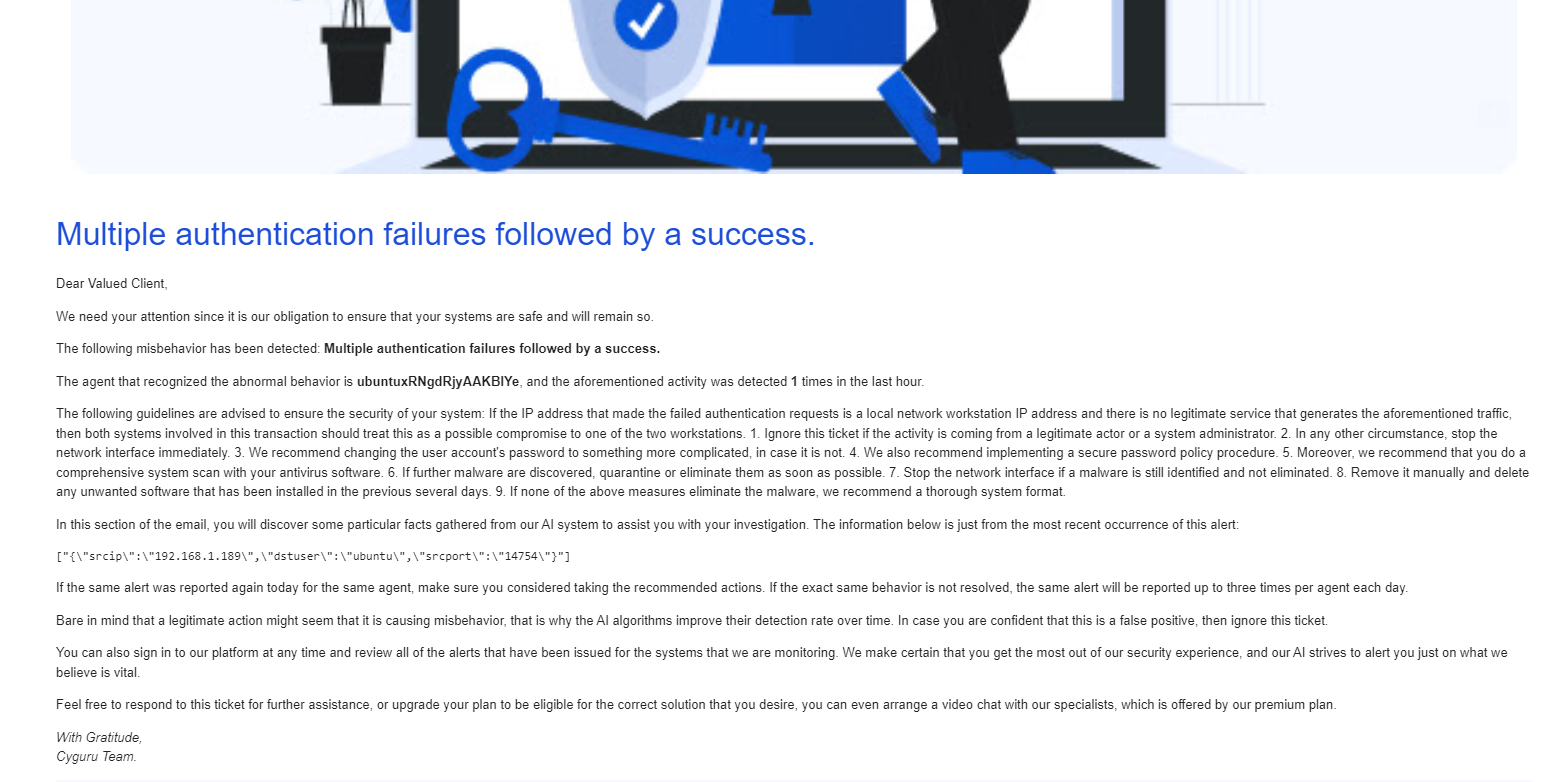
In the comprehensive alert notifications section, you will have real-time access to our analysis of the initial alert triggered. As outlined in the previous section and depending on the agreed-upon timeframe, our approach involves consistently updating the same alert ID with subsequent analyses. This systematic process ensures that you receive a continuous and evolving understanding of the security incident, including its criticality.
Throughout this ongoing analysis, the steps remain consistent with those undertaken during the examination of the first alert. However, it is crucial to note that it is the log information that undergoes modification, reflecting the most recent context that precipitated the alert. This structured methodology enables you to gain deeper insights into the security incident and its severity over time. For an enhanced viewing experience, we have incorporated HTML elements to facilitate readability and organization of information.
Agent Installation
Embark on a journey to fortify your cybersecurity defenses with the seamless installation of the Cyguru agent. Whether you prefer a hands-on approach or a swift automated process, our documentation guides you through every step with clarity and precision. Dive into the realm of heightened security as we walk you through the manual installation, providing detailed commands within the Cyguru app. Alternatively, experience the efficiency of our automatic installation, where a downloadable zip file contains an installation script and certificates for a hassle-free setup. Empower your digital landscape with the Cyguru agent, where installation becomes a gateway to enhanced protection and peace of mind.
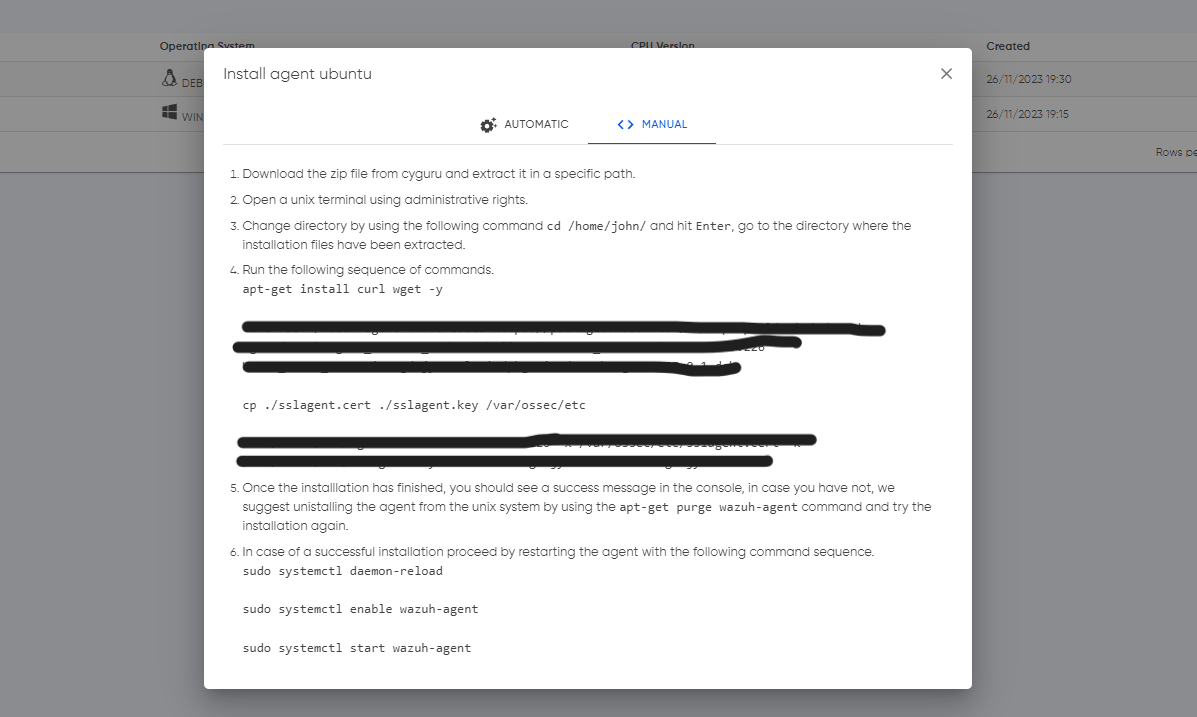
Manual or Automatic Installation
At Cyguru, flexibility is at the core of our agent installation process, offering users the freedom to choose between two seamless methods. The manual installation path provides a step-by-step guide within the Cyguru app, ensuring a straightforward and user-friendly experience.
On the other hand, our automatic installation streamlines the process further by providing a downloadable zip file containing an installation script and certificates. This dual approach empowers users to select the method that best aligns with their preferences and operational requirements, putting control and efficiency in their hands.

Supported Operating Systems
Step into a new era of cybersecurity resilience with Cyguru, a cutting-edge tool designed to fortify your digital defenses across a diverse spectrum of operating systems. From the robust landscapes of various Linux distributions, including Debian, Ubuntu, CentOS, Red Hat, and more, to the familiar terrain of Windows operating systems, both servers, and desktop editions, Cyguru stands as a versatile guardian of your cybersecurity ecosystem. Whether you navigate the Linux universe or thrive in the Windows and Mac environment, Cyguru seamlessly integrates, offering a unified solution to elevate your security posture. Dive into a comprehensive cybersecurity experience where protection knows no boundaries, and every operating system is fortified under the watchful eye of Cyguru.
- Linux distributions: Various flavors of Linux, such as Debian, Ubuntu, CentOS, Red Hat, Fedora, and more.
- Windows: Cyguru is compatible with Windows operating systems, including Windows Server editions and Windows desktop versions.
- MacOS: Cyguru is compatible with Mac operating systems, including newer and older versions as well as intel or apple silicon CPU versions.
Supported Tools and Services
Embark on the journey of heightened cybersecurity from day one with Cyguru, where our arsenal of supported software and tools is meticulously curated to fortify your digital defenses. In the early stages of production, Cyguru extends support to a select yet impactful list of software, ensuring a robust foundation for securing your digital landscape. This carefully crafted selection represents the initial pillars of our commitment to delivering comprehensive protection and resilience for your organization's evolving cybersecurity needs.
- Linux distributions (Debian, Ubuntu, CentOS, Red Hat, etc.)
- Windows
- MacOS
- FreeBSD
- OpenBSD
- Android
- iOS
- Apache HTTP Server
- Nginx
- Microsoft Internet Information Services (IIS)
- Caddy
- Lighttpd
- MySQL
- PostgreSQL
- Microsoft SQL Server
- Oracle Database
- MariaDB
- SQLite
- Suricata
- Snort
- Zeek (formerly Bro)
- OSSEC HIDS (Host-based Intrusion Detection System)
- Wazuh API
- OpenSCAP
- CrowdStrike Falcon
- Duo Security
- HashiCorp Vault
- YubiKey
- IBM QRadar
- Microsoft Azure Sentinel
- Splunk
- Syslog
- Rsyslog
- Fluentd
- Elasticsearch
- Logstash
- Kibana
- Graylog
- Grafana
- Prometheus
- InfluxDB
- Kafka
- RabbitMQ
- Apache Kafka
- Redis
- MongoDB
- LDAP
- Active Directory Federation Services (ADFS)
- Keycloak
- Shibboleth
- NGINX Unit
- Varnish
- HAProxy
- Memcached
- GitLab
- Jenkins
- Travis CI
- SonarQube
- OpenVPN
- WireGuard
- pfSense
- Sophos
- Fortinet FortiGate
- Palo Alto Networks
- OpenVAS
- Snipe-IT
- Rundeck
- HashiCorp Consul
- HashiCorp Nomad
- HashiCorp Terraform
- Apache Kafka
- Apache Flink
- RabbitMQ
- ActiveMQ
- Amazon MQ
- IBM MQ
- Mosquitto MQTT
- Mattermost
- Slack
- Microsoft Teams
- Signal
- Telegram
- Zoom
- WebEx
- Jitsi Meet
- BigBlueButton
- Mumble
- TeamSpeak
- Matrix
- Rocket.Chat
- Nextcloud
- ownCloud
- Seafile
- Azure DevOps
- Bitbucket
- Git
- GitHub
- GitLab
- Subversion (SVN)
- Jira
- Confluence
- Redmine
- GitBucket
- Airflow
- Luigi
- Ansible
- Puppet
- Chef
- SaltStack
- Foreman
- Spacewalk
- AWX
- Containerd
- CRI-O
- Podman
- OCI (Open Container Initiative)
- Many more...
- Create your agent by selecting the appropriate operating system, CPU, or version that corresponds to your computer.
- Download the zip file containing the automatic installation script and your certificates.
- Refer to the step-by-step instructions provided in the Agent Guide section for a seamless installation experience.
- Make sure you are running a privilleged powershell and also you have set correctly the Set-ExecutionPolicy as described in the agent installation guide.
- Ensure the integrity of the installation script during automatic setup. Any modifications or deviations from the step-by-step or automatic installation process may result in a violation of Cyguru's terms and conditions, potentially leading to the locking of your account.
- Upon successful installation, you should encounter the following reassuring message:
- If, however, you do not encounter the success message, navigate to the Troubleshooting section for assistance.
- Create your agent by selecting the appropriate operating system, CPU, or version that corresponds to your computer.
- Download the zip file containing the automatic installation script and your certificates.
- Refer to the step-by-step instructions provided in the Agent Guide section for a seamless installation experience.
- Make sure you are running a privilleged terminal and also you have set correctly the file execution rights as described in the agent installation guide.
- Ensure the integrity of the installation script during automatic setup. Any modifications or deviations from the step-by-step or automatic installation process may result in a violation of Cyguru's terms and conditions, potentially leading to the locking of your account.
- Upon successful installation, you should encounter the following reassuring message:
- If, however, you do not encounter the success message, navigate to the Troubleshooting section for assistance.
- Create your agent by selecting the appropriate operating system, CPU, or version that corresponds to your Mac computer.
- Download the zip file containing the automatic installation script and your certificates.
- Refer to the step-by-step instructions provided in the Agent Guide section for a seamless installation experience.
- Make sure you are running a privilleged terminal and also you have set correctly the file execution rights as described in the agent installation guide.
- Ensure the integrity of the installation script during automatic setup. Any modifications or deviations from the step-by-step or automatic installation process may result in a violation of Cyguru's terms and conditions, potentially leading to the locking of your account.
- Upon successful installation, you should encounter the following reassuring message:
- If, however, you do not encounter the success message, navigate to the Troubleshooting section for assistance.
- Create a virtual machine with one of the supported operating systems: Windows, CentOS (Red Hat), or Debian-based.
- Install the Cyguru agent on the virtual machine following the steps outlined above.
- Copy and run the following Python code as "server.py" on the virtual machine, you can run it using python "python3 server.py" or using the nohup command "nohup python3 server.py &" :
- Ensure the Syslog server is running and monitoring logs on the designated virtual machine as instructed above.
- For scalability, you can run multiple syslog servers with a Load Balancer in front.
- Modify the Cyguru agent configuration to monitor the local file where the logs are being written, for reference see the next documentation section for agent modification.
- Last Step! Configure all unsupported infrastructure that you want to monitor to send logs to the IP address of the virtual machine hosting the Syslog server and the designated syslog port (514).
- You are ready to go!
- Ensure the current installation of the agent is deleted, especially if the installation has failed. Refer to the Removal section for guidance on uninstallation.
- Verify that you have not modified the installation script. If you opted for manual installation, ensure you followed the step-by-step guide meticulously.
- Ensure that you have internet connection.
- If modifications were made or issues persist, check the validity of your certificates. If expired, delete the agent in the UI, recreate it, and download the new zip file. Then retry the installation process.
- If none of the above fixed your issue, contact Cyguru.
- Search the word "Services" in your windows search taskbar.
- Open the Windows Services application and find the service at the end of the list, with the actual status.
- Agent Naming Rules:
- Agent names must be unique within your Cyguru environement and App.
- Use alphanumeric characters for agent names.
- Avoid using special characters or spaces in agent names.
- Ensure agent names are easily identifiable and reflect the associated system or purpose.
- If you delete any agent from the UI, for at least one hour, do not re-use that agent name.
- In the case of each Cyguru agent, a unique customer string is automatically appended to its name. This is a standard behavior. You can identify your agent based on the first part of its name, which you have initially assigned
- General Guidelines for the Cyguru App:
- Do not alter the installation script under any circumstances.
- Follow the step-by-step installation guide precisely as provided in your UI.
- Engaging in any of the aforementioned actions is a violation of Cyguru's terms and conditions and might cause limitations to your account.
- Delete the agent from the Cyguru UI.
- Recreate the new agent in the Cyguru UI.
- Do not transfer the installation script to another machine.
- Avoid adding the same name to the new agent.
- Download the new installation script.
- Follow this process to ensure a smooth transition and avoid any potential damage to your monitoring infrastructure.
- Adhering to these steps is vital, as it also aligns with Cyguru's terms and conditions which may cause a limitation to your account.
Watch as this foundation flourishes, for our commitment to growth is unwavering. The list may be short now, but with every stride, it will burgeon into a formidable forest of defense, adapting to the ever-evolving landscape of digital security.
Client Certificates Expiration
To ensure the highest level of security, Cyguru employs a dynamic approach to certificate management. Whether you opt for the manual command line method or the installation script, users are required to download certificates from the provided zip file.
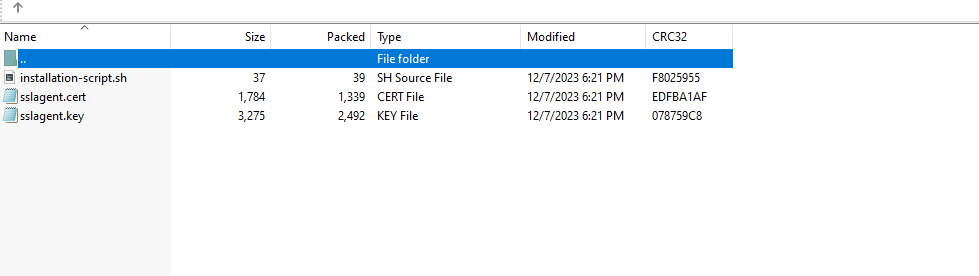
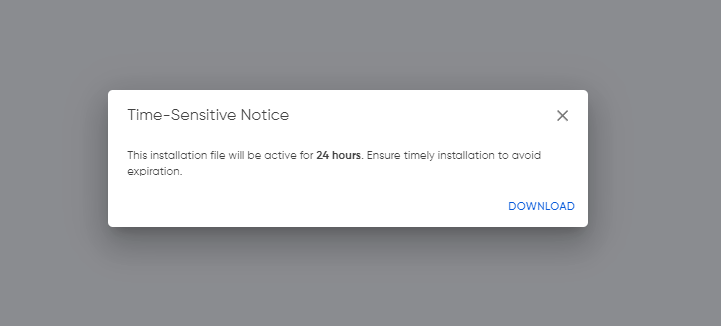
These certificates, crucial for agent installation, carry a validity window of a mere couple of hours from the moment of download. As a proactive security measure, we diligently update these certificates every 24 hours. Consequently, once downloaded, users have less than 24 hours before the certificates expire.
In the event of an installation failure, detailed in the subsequent section, users are advised to promptly delete the affected agent from the user interface. This proactive step allows for the recreation of the agent, ensuring the acquisition of newly updated certificates and maintaining the integrity of the security infrastructure.
It is crucial to install your agents promptly upon creation in the UI. Failure to do so may lead to the expiration of your certificates, necessitating the re-creation of agents in the UI. Ensure a seamless and secure monitoring experience by consistently installing agents right after their creation to avoid any disruptions due to certificate expiration.
Workstation-Type (Low Volume) Agent
In Cyguru, we classify agents into two types: Workstations and Servers. Despite the uniform functionality of the installation script due to a shared operating system, it's essential to recognize that server agents demand a notably higher bandwidth compared to their workstation counterparts. Cyguru has implemented a system to differentiate and allocate the necessary bandwidth within our infrastructure, ensuring optimal security for your system.
Installing a workstation-type agent on a server, however, may compromise the optimal functionality of Cyguru SOC. This misalignment in agent types within your infrastructure could result in suboptimal performance, affecting both the efficiency of our security protocols and the overall security posture of your system.
Understanding your infrastructure needs is crucial as a client. It's essential to purchase only the services that align with your specific requirements.
Although there are two types of agents, tagged as workstation and server types, it is very important for our customers to know more so that they can modify their plan accordingly. A workstation agent is an agent that can accept a certain amount of EPS (events per second). In our case, the workstation type agent accepts 200 EPS, which is a huge amount for a workstation. Typically, a workstation is sufficient with 20-25 EPS, depending on its purpose. This implies that if an organization has servers with relatively low traffic in the services they run, these servers can utilize a workstation agent and may not require a Server type agent.
On the other side, Server type agents are designed for high volume servers. In a large organization, a high volume server can generate anywhere from 2000 to 5000 EPS. Such servers often include critical infrastructure components like Domain Controllers, Firewalls, Routers, etc. These machines unquestionably demand a high volume agent. Therefore, it is crucial for organizations to thoroughly understand their needs to optimize their expenses in Cyguru and align their plan accordingly.
Server-Type (High Volume) Agent
In Cyguru, we classify agents into two types: Workstations and Servers. Despite the uniform functionality of the installation script due to a shared operating system, it's essential to recognize that server agents demand a notably higher bandwidth compared to their workstation counterparts. Cyguru has implemented a system to differentiate and allocate the necessary bandwidth within our infrastructure, ensuring optimal security for your system.
If, by mistake, a server agent is installed as a workstation agent, no adverse impact will occur on our services towards you. However, it's noteworthy that you will be charged for a service that may not align with your actual needs.
Understanding your infrastructure needs is crucial as a client. It's essential to purchase only the services that align with your specific requirements.
Although there are two types of agents, tagged as workstation and server types, it is very important for our customers to know more so that they can modify their plan accordingly. A workstation agent is an agent that can accept a certain amount of EPS (events per second). In our case, the workstation type agent accepts 200 EPS, which is a huge amount for a workstation. Typically, a workstation is sufficient with 20-25 EPS, depending on its purpose. This implies that if an organization has servers with relatively low traffic in the services they run, these servers can utilize a workstation agent and may not require a Server type agent.
On the other side, Server type agents are designed for high volume servers. In a large organization, a high volume server can generate anywhere from 2000 to 5000 EPS. Such servers often include critical infrastructure components like Domain Controllers, Firewalls, Routers, Web Servers, etc. These machines unquestionably demand a high volume agent. Therefore, it is crucial for organizations to thoroughly understand their needs to optimize their expenses in Cyguru and align their plan accordingly.
Windows Agent Installation

Debian - Linux Agent Installation
Centos - Red Hat Agent Installation
MacOS Agent Installation
Syslog Based Systems
When a system, such as a firewall or router, lacks a compatible agent for its operating system, and syslog support is necessary, it poses a challenge for seamless integration into the Cyguru environment. Syslog is a standard protocol used for forwarding log messages in an Internet Protocol (IP) network. Cyguru relies on agents compatible with various operating systems to collect and process these logs for effective cybersecurity monitoring. In the absence of a compatible agent for a specific operating system, the system's logs may remain unmonitored by Cyguru. This could lead to a gap in threat detection and compromise the overall security posture of the monitored infrastructure. To address this limitation, users are encouraged follow the following guide and use Cyguru's Centralized Syslog implementation and guide:
import logging
import socketserver

LOG_FILE = 'yourlogfile.log'
HOST, PORT = "0.0.0.0", 514

logging.basicConfig(level=logging.INFO, format='%(message)s', datefmt='', filename=LOG_FILE, filemode='a')

class SyslogUDPHandler(socketserver.BaseRequestHandler):
  def handle(self):
    data = bytes.decode(self.request[0].strip())
    socket = self.request[1]
    print( "%s : " % self.client_address[0], str(data))
    logging.info(str(data))


if __name__ == "__main__":
  try:
    server = socketserver.UDPServer((HOST,PORT), SyslogUDPHandler)
    server.serve_forever(poll_interval=0.5)
  except (IOError, SystemExit):
    raise
  except KeyboardInterrupt:
    print ("Crtl+C Pressed. Shutting down.")
Agent Removal
When circumstances necessitate the removal of your Cyguru Wazuh agent—whether for troubleshooting or reinstallation—this section provides a step-by-step guide to ensure a comprehensive and clean uninstallation process. Follow these instructions meticulously to safely and completely remove the Cyguru Wazuh agent from your system.
Windows Agent Removal
For Windows users, uninstalling the Cyguru Wazuh agent is a straightforward process. Simply navigate to the "Add or Remove Programs" section in the Windows system, locate the Wazuh agent entry, and click on the "Uninstall" button. Follow any on-screen prompts to complete the uninstallation. This streamlined approach ensures a quick and hassle-free removal of the Cyguru Wazuh agent from your Windows environment.

Debian - Linux Agent Removal
For Debian-based Linux systems, uninstalling the Cyguru Wazuh agent is a breeze. Open a privileged terminal and execute the following command:
apt purge wazuh-agent -yThis command efficiently removes the Wazuh agent from your Debian-based system. Once executed, the uninstallation process is complete, ensuring a swift and straightforward removal.
Centos - Red Hat Agent Removal
For Centos (Red Hat) Linux systems, uninstalling the Cyguru Wazuh agent is a breeze. Open a privileged terminal and execute the following command:
yum remove wazuh-agent -yThis command efficiently removes the Wazuh agent from your Centos (Red Hat) system. Once executed, the uninstallation process is complete, ensuring a swift and straightforward removal.
Agent Troubleshooting
In the Installation section, a successful installation message serves as the hallmark of a seamless setup process. If, however, you encounter anything other than this reassuring confirmation, it indicates a potential hiccup in the installation journey. This is precisely why our Troubleshooting section exists — to guide you through any unexpected issues and facilitate the resolution of installation-related challenges. Navigate to this dedicated Troubleshooting section to uncover insights, step-by-step instructions, and solutions that will assist you in diagnosing and addressing any anomalies, ensuring your Cyguru experience remains smooth and secure.
MacOS Agent Removal
For MacOS unix systems, uninstalling the Cyguru Wazuh agent is a standard process. Open a privileged terminal and execute the following commands:
sudo /Library/Ossec/bin/wazuh-control stop
sudo /bin/rm -r /Library/Ossec
sudo /bin/launchctl unload /Library/LaunchDaemons/com.wazuh.agent.plist
sudo /bin/rm -f /Library/LaunchDaemons/com.wazuh.agent.plist
sudo /bin/rm -rf /Library/StartupItems/WAZUH
sudo /usr/bin/dscl . -delete "/Users/wazuh"
sudo /usr/bin/dscl . -delete "/Groups/wazuh"
sudo /usr/sbin/pkgutil --forget com.wazuh.pkg.wazuh-agent
These commands efficiently remove the Wazuh agent from your MacOS unix system. Once executed, the uninstallation process is complete, ensuring a swift and straightforward removal.
Agent Troubleshooting
In the Installation section, a successful installation message serves as the hallmark of a seamless setup process. If, however, you encounter anything other than this reassuring confirmation, it indicates a potential hiccup in the installation journey. This is precisely why our Troubleshooting section exists — to guide you through any unexpected issues and facilitate the resolution of installation-related challenges. Navigate to this dedicated Troubleshooting section to uncover insights, step-by-step instructions, and solutions that will assist you in diagnosing and addressing any anomalies, ensuring your Cyguru experience remains smooth and secure.
Unsuccessful Installation
In the event that the expected success message is not displayed, consider the following refined instructions:
Agent Service OS Status
To inspect the current state of the Cyguru Wazuh agent running on your monitoring machine, execute the following command in both Debian-Based and Centos (Red Hat) operating systems:
service wazuh-agent status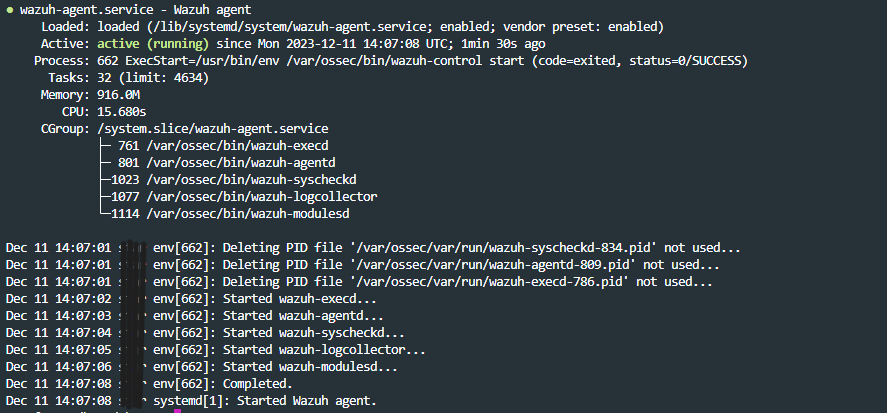
To inspect the current state of the Cyguru Wazuh agent running on your monitoring machine, in a Windows Based operating system:

To inspect the current state of the Cyguru Wazuh agent running on your monitoring machine, in a Mac-Based operating system run the following command:
/Library/Ossec/bin/wazuh-control statusNever Connected Status
In the event of a 'never connected' agent status, take the following actions: First, check if the agent service is running by executing the 'service wazuh-agent status' command or referring to the 'Agent Service OS Status' section in the documentation. If the agent is running, wait until the caching of the agents' dashboard expires to load new live data. If the 'never connected' status persists, proceed to reinstall the agent using the steps outlined in the 'Agent Removal' and then, the 'Agent Installation' section.
Agent Naming Rules
Below are guidelines for naming agents and general usage recommendations for the Cyguru app.
Agents Replacing
When replacing an agent, meaning transferring it from one virtual machine to another, it is crucial to follow a specific process. Initially, delete the agent from the Cyguru UI, and subsequently, recreate the new agent. It is essential not to transfer the installation script to another machine, as doing so can result in damage to your monitoring infrastructure and is also a violation of Cyguru's terms and conditions.
Support
Welcome to the Support Documentation section, your comprehensive resource for navigating and resolving queries related to Cyguru. Here, you'll find a wealth of information, guides, and troubleshooting insights meticulously crafted to assist you on your journey with our cybersecurity platform. Whether you're seeking setup assistance, troubleshooting guidance, or exploring advanced features, this section is designed to empower you with the knowledge needed to optimize your experience. Dive into our support documentation to unlock the full potential of Cyguru and ensure a seamless and secure cybersecurity operations journey.
Contacting Support
For any questions, assistance, or inquiries, we encourage you to reach out to us at Cyguru. Our dedicated support team is ready to provide prompt and helpful responses to ensure you have the best possible experience with Cyguru. Feel free to contact us with any concerns or queries, and we'll be delighted to assist you in optimizing your cybersecurity operations with Cyguru.